Friday, April 19, 2019

Set up A Hyper-v virtual switch using a NAT network from power shell

This blog totally  inspire from https://www.thomasmaurer.ch/

You can find more info here.

https://www.thomasmaurer.ch/2016/05/set-up-a-hyper-v-virtual-switch-using-a-nat-network/

I am not good to understand the IP address world so just making a simple note for my self and other guys like me.

Please follow the below steps to get the internet access in your VM machine

1. Create a new Hyper-V Virtual Switch

      New-VMSwitch –SwitchName "ViaMonstraNAT" –SwitchType Internal

2.  Configure the NAT Gateway IP Address

     New-NetIPAddress –IPAddress 172.21.21.1 -PrefixLength 24 -InterfaceAlias "vEthernet (ViaMonstraNAT)"

3. Now you can configure the NAT rule

     New-NetNat –Name ViaMonstraNATNetwork –InternalIPInterfaceAddressPrefix 172.21.21.0/24

     Use IP Address in VM host namchine from 172.21.21.2-172.21.21.254.

Here is IP address configuration we apply in VM host machine

    Host Machine, running Windows 10 1703 build
    IP Address – 172.21.21.1
    Subnet Mask – 255.255.255.0

Host VM, running Windows Server 2012 R2


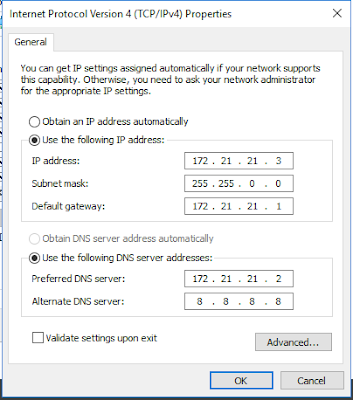
   IP Address – 172.21.21.2
   Subnet Mask – 255.255.255.0
   Default Gateway – 172.21.21.1
   Preferred DNS Server – 8.8.8.8


Prefer IP Address Example:


MSIX Packaging


Thursday, April 18, 2019

Format-Table function in Power -Shell ..

Very impotent function of power shell is Format-Table.You can get the data in table format.Here is some example is  .

1.  Get-Process | Format-Table


2.  Get-Process | Format-Table -AutoSize

     The AutoSize parameter adjusts the column widths to minimize spacing.


3.  Get-Process | Sort-Object -Property basepriority | Format-Table -GroupBy basepriority -Wrap

The GroupBy parameter arranges the data about the processes into groups based on the value of their BasePriority property


4.  Get-Process -Name powershell | Format-List -Property ProcessName,FileVersion

The Format-List cmdlet displays an object in the form of a listing, with each property labeled and displayed on a separate line:


5.  Get-pssnapin | format-table -wrap


6.  You can export Format-Table in Format-Table.txt.

    $Proc = Get-Process | Format-Table -AutoSize

    $Proc | Format-Table Name | Out-File c:\temp\ Format-Table.txt


Tuesday, April 16, 2019

Power-shell to Copy file from directories with today's date to another location (Using ROBOCOPY.exe)

I have developed the power shell to copy your data from one location to another location with the help of windows inbuilt  ROBOCOPY utility.This logic help you to copy data from one location to another locations.
I Hope this will help you..


################################################################################

$Script:sScriptFolder = (Get-Item $($MyInvocation.MyCommand.Path)).DirectoryName
$Script:sSystemDrive = "$Env:SystemDrive"

$sVDIMSTName1 = Get-Content "c:\SWKSoftware\VDIComputers.txt"
$sgetDateTime =  Get-Date -Format g
                    
                    $strSourcePath = "C:\Temp\Dir1\"      # Enter your source Dir path here
                    $sDestinationPath = "C:\Temp\Dir2\"  # Enter your Destination Dir path here
                    
                    If ((Test-Path -Path $strSourcePath) -AND (Test-Path -Path $sDestinationPath)) 
                    {
                        #Copy-Item "$strSourcePath\*.*" -Destination "$destinationPath" -Force -Recurse

                        $sScrParentFolder = split-Path -path $strSourcePath -Leaf

                        #$sgetDateTime =  Get-Date -Format s

                        $sgetDateTime1 = $(get-date -f yyyyMMdd_HH-mm-ss)
                        
                        $sDateTimeFolderName =  $sScrParentFolder + "-" + $sgetDateTime1
                        
                        
                        $sDestinationPath = New-Item -ItemType Directory -Path "$sDestinationPath\$sDateTimeFolderName"


                        ROBOCOPY.EXE $strSourcePath $sDestinationPath /COPYALL /B /SEC /MIR /R:0 /W:0 /NFL /NDL


                    Else 
                    {
                        Write-host " Source or Destination is not reachable or does not exist..."
                    }


################################################################################

Note:- Please test script in your test environment before running in production directly.

Monday, April 15, 2019

Step by step guide for creating google windows cloud machine on - https://cloud.google.com

Google Launch the cloud platform to create your VM machine on cloud. Its going to make big change in infra landscape and big competitor for Amazon (AWS) and  Microsoft(Azure).Google always think about consumer .


Here you can see how to create google cloud windows machine and take RDP from your machine.

Login https://cloud.google.com from your Gmail ID. You have to enter your credit card detail for make sure you are authentic user. Google is giving 300$ for one free for free trail so it will not deduct any amount of money

Until you will not upgrade it manually. This is the cheapest services on cloud.
Once you have done with credit card details.

1. Lets connect Console.


2.  Once you are connected.Please enable Computing Engine  and search top VMINSTANT in search bar


3.  Then Click on Create Button.


4.   Now you can see below form and give your first VM name in small letter and select in which      region you want to create VM .I am selection Europe and select your VM configuration, Machine   type, Memory.


5. Select boot media which operating system you want opt .I have select Windows server 2016 .Please click change button 


6. Scroll down to find your OS boot media and select click on select button.


7.  Access scope  should be Allows HTTPS  Traffic  and create your VM. Once you hit select button .It starting a creating VM in background and magic of GOOGLE. Its create within 1 minutes 


8.   Now you can see your first VM machine.


9. Take RDP Google Cloud test machine.select set windows Password .Please copy you user name password .


 10. Click on your machine and select the RDP option and .It will not show again.


11. Double click on RDP session


12. Enter you user name password 


13.  Press yes again for certificate 


14 Enjoy your VM experience with google  ðŸ˜Š


Thanks for viewing. I hope it will help you.More configuration you can visit belong google links

Links :


Wednesday, April 3, 2019

How to Get windows Operating System Details with PowerShell


Here is the some command to get the windows system info from Power-Shell scripts.


windows 10 name, architecture, operating system

  $sOSName = (Get-WMIObject win32_operatingsystem).name
  Write-Host "OS NAME = $sOSName " -ForegroundColor Green `n

  $sOSArchitecture = (Get-WmiObject Win32_OperatingSystem).OSArchitecture
  Write-Host "OS Architecture = $sOSArchitecture " -ForegroundColor Yellow `n

  $sSystemName = (Get-WmiObject Win32_OperatingSystem).CSName
  Write-Host "System Name = $sSystemName " -ForegroundColor Red `n


1. Get-WmiObject -Class Win32_ComputerSystem
    Get-CimInstance Win32_OperatingSystem -ComputerName dc1, dc2


2.  Get-CimInstance Win32_OperatingSystem | Select-Object Caption, Version,                 ServicePackMajorVersion, OSArchitecture, CSName, WindowsDire


     All computer Info
3.  Get-ComputerInfo -Property "os*"


   Listing BIOS Information

 4. Get-CimInstance -ClassName Win32_BIOS


5. Hot Fix Installed in windows machine.

Get-WmiObject -Class Win32_QuickFixEngineering


6. Get-CimInstance Win32_OperatingSystem | Select-Object  Caption, InstallDate,  ServicePackMajorVersion, OSArchitecture, BootDevice,  BuildNumber, CSName | FL


Note:- Please test script in your test environment before running in production directly.

Tuesday, March 19, 2019

Progress bar in Power-Shell


Progress bar function is very important function in power shell. It’s always good to use show progress bar when you are running some process in your script. GUI effect makes you script much interactive and informative .Here  I am discussing  some of the power shell progress bar .We my be help full to someone.


#################################################################################

for($I = 1; $I -lt 101; $I++ )
{
    Write-Progress -Activity Updating -Status 'Progress->' -PercentComplete $I -CurrentOperation OuterLoop
    for($j = 1; $j -lt 101; $j++ )
    {
        Write-Progress -Id 1 -Activity Updating -Status 'Coping the file' -PercentComplete $j -CurrentOperation InnerLoop
    }
}

#################################################################################


################################# Function on progress bar ###########################

function Progress-Bar($iSeconds,$sInUnString)
{
    $Host.UI.RawUI.BackgroundColor = ($bckgrnd ='Black')                                                               # Changing the progress bar color and background text color
   # $Host.PrivateData.ProgressForegroundColor ='Green'
   # $Host.PrivateData.ProgressBackgroundColor='Black'

    $DoneDT = (Get-Date).AddSeconds($iSeconds)
    while($DoneDT -gt (Get-Date))
{
        $iSecondsLeft = $DoneDT.Subtract((Get-Date)).TotalSeconds
        $iPercent = ($iSeconds - $iSecondsLeft) / $iSeconds * 100
        Write-Progress -Activity "$sInUnString Apple.." -Status " " -PercentComplete $iPercent
        [System.Threading.Thread]::Sleep(500)
    }
 }

 Progress-Bar "20" "Best Company to work"

#################################################################################


############################### Time you can give here ##############################

$totalTimes = 10

  $i = 0

  for ($i=0;$i -lt $totalTimes; $i++) {

  $percentComplete = ($i / $totalTimes) * 100

  Write-Progress -Activity 'Work in Progress' -Status "Did thing $i  times" -PercentComplete $percentComplete

  sleep 1

}

#################################################################################


################################# Pause Program for 15 min #########################

###===========================
### Pause Program for 15 min
### - Matt Brown, 2008
###===========================
$x = 15*60
$length = $x / 100
while($x -gt 0) {
  $min = [int](([string]($x/60)).split('.')[0])
  $text = " " + $min + " minutes " + ($x % 60) + " seconds left"
  Write-Progress "Pausing Script" -status $text -perc ($x/$length)
  start-sleep -s 1
  $x--
}

#################################################################################


################################## Three progress bar################################

for ($i = 1; $i -le 2; $i++)
{
    Write-Progress -ID 1 -Activity "Outer loop" -Status "Tick $i" -percentComplete ($i / 2*100)
    for ($j = 1; $j -le 3; $j++)

    {
               Write-Progress -ID 2 -Activity "Mid loop" -Status "Tick $j" -percentComplete ($j / 3*100)
               for ($k = 1; $k -le 3; $k++)

           {

            Write-Progress -ID 3 -Activity "Inner loop" -Status "Tick $k" -percentComplete ($k / 3*100)
            Sleep(1)
           }
    }

}

#################################################################################

Monday, March 18, 2019

Create and remove new directory,file and folder using Power-Shell.


Creation and removal of directory\folder\file  in power shell is very easy .you just have pass simple command in script. Here we will see some of the example how we can create new Directory\Folder\File


Creating new Directory

New-Item -Path "c:\" -Name "Dir1" -ItemType "directory"

Creating multiple Dir using power shell

New-Item -ItemType "directory" -Path "c:\Dir1\Dir2"

New-Item -ItemType "directory" -Path "c:\Dir1\Dir2" -ErrorAction SilentlyContinue  

New-Item -ItemType Directory -Force -Path C:\Dir\You\Can\Create\Any\Time\Here


Check path exist or not condition here..

$path = "c:\Dir1\Dir2"

If(!(test-path $path))
{
      New-Item -ItemType Directory -Force -Path $path
}

Creating new test file and enter new test values.

New-Item -Path C:\Temp\ -Name "testfile1.txt" -ItemType "file" -Value "This is a text string."

Create multiple files

New-Item -ItemType "file" -Path "c:\ps-test\test.txt", "c:\ps-test\Logs\test.log"


Removing files and folder from power shell

Remove-Item –path c:\Dir1\Dir2 –recurse

Remove-Item -Path "c:\Dir1\Dir2" -Force -Recurse

Remove-Item "c:\Dir1\Dir2" -Force  -Recurse -ErrorAction SilentlyContinue


The –recurse parameter will allow Power Shell to remove any child items without asking for permission

More Complex Delete Operations

Remove-Item –path c:\test\ remove-item * -include *.mp3 –recurse

More Complex Delete Operations

Remove-Item –path c:\folder\* -include *.txt


Delete the 'demo' registry key and all of its subkeys and values:

Remove-item hklm:\software\SS64\demo -Recurse


Note:- Please test script in your test environment before running in production directly.

Friday, March 8, 2019

Change font color in Power-Shell and display in PS console

Every want color full life and color full job. Some time watching a black and white console makes thing very boring bring some color in your power shell console. Change font color using the power shell script. Its always looks good when you code have some significant color in console .As a script-er you have to show some nice color in power shell scripts.


In order to change the colors, I’ll familiarize myself with where that info is stored.This info is stored in the variable $host

you want to be cool and use Power-Shell to list the enum values.

1.
[System.Enum]::GetValues('ConsoleColor') | ForEach-Object { Write-Host $_ -ForegroundColor $_ }


2.  Change the font color of the console

      $host.UI.RawUI.ForegroundColor = "DarkGreen"

3.  Changing the main console foreground and background is slightly different. That data is stored in       a separate location.

      $host.UI.RawUI.ForegroundColor = "DarkGreen"
      $host.UI.RawUI.BackgroundColor = "Black"

4. Write with different text and background colors

     Write-Host "Whole text is in red" -ForegroundColor Red
     Write-Host "Red on white text." -ForegroundColor green -BackgroundColor black

5. Write to the console without adding a new line

     Write-Host "no newline test " -NoNewline
     Write-Host "second string"

6. Suppress output from Write-Host

    Write-Host "I won't print" -InformationAction Ignore

7. Color full console 

   Write-Host "Green " -ForegroundColor Green -NoNewline; 
   Write-Host "Red " -ForegroundColor Red -NoNewline; 
   Write-Host "Yellow " -ForegroundColor Yellow -NoNewline;


Note:- Please test script in your test environment before running in production directly.

Tuesday, March 5, 2019

How we can get the script file system location of from Power-Shell script ?


Here is the some cases we have to get power shell script system directory path .There is many way to achieve that .Power shell have some inbuilt function to get system directory and script path and root n-1 directory.
I am showing some example here. This examples may be help you to get your target Dir.


1. Best way to get Script directory path is

         $PSScriptRoot

Just save below code in .PS1 format and run it and you will get Dir path

         $ScriptName = $PSScriptRoot
         Write-host $ScriptName

Note:- For using $PSScriptRoot method your power shell version has 3.0 or above.If you have below 3.0 power shell function so please use below methods.

2. Get power shell script path

         $Script:sScriptFolder = (Get-Item $($MyInvocation.MyCommand.Path)).DirectoryName
         Write-Host $sScriptFolder

3. Get power shell script path

         $MyDir = [System.IO.Path]::GetDirectoryName($myInvocation.MyCommand.Definition)
         Write-Host $MyDir

4. Get power shell script file name.This is very good function

         $MyDir1 = $MyInvocation.MyCommand.Name
         Write-Host $MyDir1

5. Get complete power shell script path.

         $script_path = $myinvocation.mycommand.path
         Write-Host "Current ScriptPath $script_path"

6. Get the current directory of the cmdlet being executed

         (Get-Item -Path ".\").FullName

7. Get Script parent folder N-1 and N-2 folder path.This script will help you.

         $scriptPath = (Get-Item $($MyInvocation.MyCommand.Path)).DirectoryName
         $parentPath = Split-Path -parent $scriptPath
         Write-host $parentPath
         $rootPath = Split-Path -parent $parentPath
         Write-host $rootPath


Note:- Please test script in your test environment before running in production directly.