Tuesday, May 7, 2019

How to share\Copy ISO,EXE,Software files in VM Hyper-v machine from local host machine

If you are working on Hyper-V Lab machines or you have created your own lab for any infra related work and development purpose. Some of the scenario you face issue to copy data from host to Hyper-v machines.
you want to copy ISO file, Office packages, SAP Application and any other data from host machine to  Hyper-V machine .Here is the step you can  follow .I hope it will work.

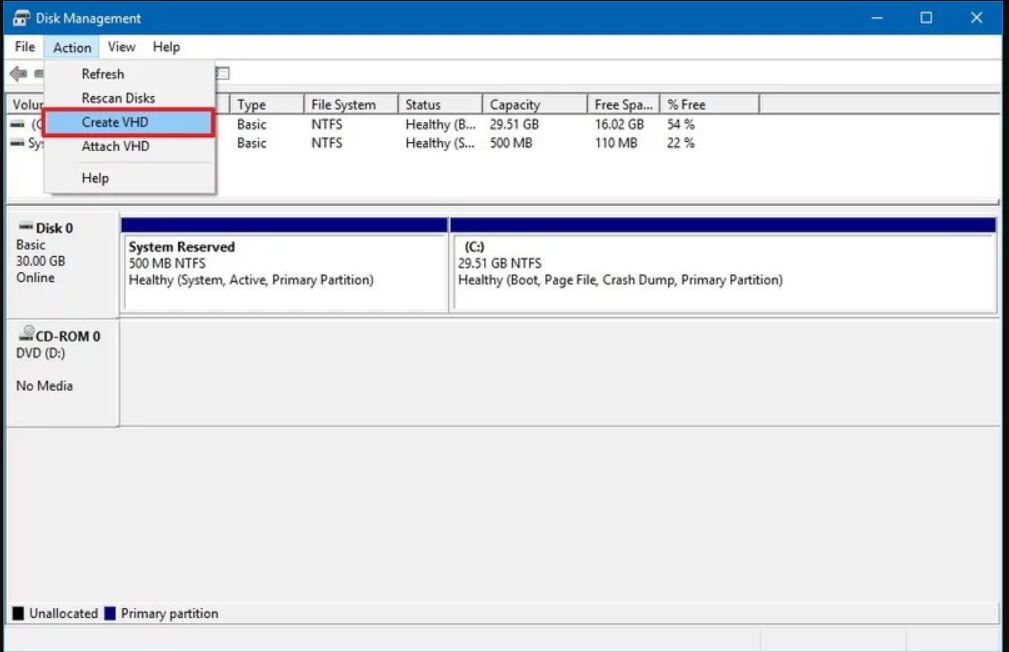
  1. Open Run ( Win+r )  or type the command  Diskmgmt.msc
  

2.   Now go to Action tab and Create VHD 


3. Now browses the path in your machine where you want to keep VSD EX C:\Dir1
4. You can assign the space like 20 GB or 50GB as per your availability .It support up 2040 GB .
5. Check virtual hard disk size format VHD and click OK Button


Now create simple volume to mount  VHD

  1. Now open Diskmgmt.msc and  you can see new disk.
  2. The Initialize Disk window will automatically appears, select a partition style for the disk and click Ok.
  3. Select MBR Partition 
    4.   Right Click on the disk and choose New Simple Volume, when the volume wizard opened just                click Next to continue and put the value and  select the default option and click on finish.


       If disk is offline just right click and make it on line

      Now you can see the volume is creates in your host machine.


Just copy your data into disk what ever you want to transfer into VM and you can attached the VHD disk into the VM hyper-v machine.


How to connect to VHD disk into Hyper v machine

  • Open Hyper-v Manager in your host machine
  • Select the Virtual Machine that you would like to attach a virtual disk(VHD)
  • Click in Settings from the right side.


  • Click in SCSI Controller from the left side
  • Select Hard drive and click Add


  • Click Browse (VHD)and find the virtual disk that you would like to attach
  • Click OK


Now you see the new drive in your VM machines.


More info you can see below link.


Monday, April 29, 2019

Power shell and .vbs to get machine OU details from AD


You can get the machine name OU Details from using below command and VB script

Power-Shell

([adsisearcher]"(&(name=$env:computername)(objectClass=computer))").findall().path


VB Script (save below command in.vbs Fotomat)

########################################################################

On Error Resume Next

Set WshNetwork = CreateObject("WScript.Network")
ComputerName = WshNetwork.ComputerName

Set objADSysInfo = CreateObject("ADSystemInfo")
strComputerName = objADSysInfo.ComputerName

Set objComputer = GetObject("LDAP://" & strComputerName)
strOUName = objComputer.DistinguishedName
strOUs = Split(strOUName, ",")
MsgBox strOUs(2)
MsgBox strOUs(1)
strOU = Split(strOUs(2), "=")

#######################################################################


Get computer name from hard disk or Slave Drive

Suppose you have  situation where you have detach hard drive and you want to know the computer name without inserting in computer .Here is the steps you can follow.or you have old hard drive into the new PC and want to know the PC name so you can rejoin the domain.
Please follow  the steps here.


connect your hard disk by cable in your test machine or you already inserted disk in PC.Both the conditions please below steps.

1. Open Regedit on the lab system from RUN window and Go to file option in menu and click on load hive.
2. Please enter the name like Mymachine
3. Navigate to below path
    SystemDrive:\Windows\System32\config\  and browse the System file.
4. Now navigate the hive  HKLM

HKEY_LOCAL_MACHINE\SYSTEM\ControlSet001\Control\ComputerName\ComputerName


 Hope this info will help some one...


Friday, April 19, 2019

Set up A Hyper-v virtual switch using a NAT network from power shell

This blog totally  inspire from https://www.thomasmaurer.ch/

You can find more info here.

https://www.thomasmaurer.ch/2016/05/set-up-a-hyper-v-virtual-switch-using-a-nat-network/

I am not good to understand the IP address world so just making a simple note for my self and other guys like me.

Please follow the below steps to get the internet access in your VM machine

1. Create a new Hyper-V Virtual Switch

      New-VMSwitch –SwitchName "ViaMonstraNAT" –SwitchType Internal

2.  Configure the NAT Gateway IP Address

     New-NetIPAddress –IPAddress 172.21.21.1 -PrefixLength 24 -InterfaceAlias "vEthernet (ViaMonstraNAT)"

3. Now you can configure the NAT rule

     New-NetNat –Name ViaMonstraNATNetwork –InternalIPInterfaceAddressPrefix 172.21.21.0/24

     Use IP Address in VM host namchine from 172.21.21.2-172.21.21.254.

Here is IP address configuration we apply in VM host machine

    Host Machine, running Windows 10 1703 build
    IP Address – 172.21.21.1
    Subnet Mask – 255.255.255.0

Host VM, running Windows Server 2012 R2


   IP Address – 172.21.21.2
   Subnet Mask – 255.255.255.0
   Default Gateway – 172.21.21.1
   Preferred DNS Server – 8.8.8.8


Prefer IP Address Example:


MSIX Packaging


Thursday, April 18, 2019

Format-Table function in Power -Shell ..

Very impotent function of power shell is Format-Table.You can get the data in table format.Here is some example is  .

1.  Get-Process | Format-Table


2.  Get-Process | Format-Table -AutoSize

     The AutoSize parameter adjusts the column widths to minimize spacing.


3.  Get-Process | Sort-Object -Property basepriority | Format-Table -GroupBy basepriority -Wrap

The GroupBy parameter arranges the data about the processes into groups based on the value of their BasePriority property


4.  Get-Process -Name powershell | Format-List -Property ProcessName,FileVersion

The Format-List cmdlet displays an object in the form of a listing, with each property labeled and displayed on a separate line:


5.  Get-pssnapin | format-table -wrap


6.  You can export Format-Table in Format-Table.txt.

    $Proc = Get-Process | Format-Table -AutoSize

    $Proc | Format-Table Name | Out-File c:\temp\ Format-Table.txt


Tuesday, April 16, 2019

Power-shell to Copy file from directories with today's date to another location (Using ROBOCOPY.exe)

I have developed the power shell to copy your data from one location to another location with the help of windows inbuilt  ROBOCOPY utility.This logic help you to copy data from one location to another locations.
I Hope this will help you..


################################################################################

$Script:sScriptFolder = (Get-Item $($MyInvocation.MyCommand.Path)).DirectoryName
$Script:sSystemDrive = "$Env:SystemDrive"

$sVDIMSTName1 = Get-Content "c:\SWKSoftware\VDIComputers.txt"
$sgetDateTime =  Get-Date -Format g
                    
                    $strSourcePath = "C:\Temp\Dir1\"      # Enter your source Dir path here
                    $sDestinationPath = "C:\Temp\Dir2\"  # Enter your Destination Dir path here
                    
                    If ((Test-Path -Path $strSourcePath) -AND (Test-Path -Path $sDestinationPath)) 
                    {
                        #Copy-Item "$strSourcePath\*.*" -Destination "$destinationPath" -Force -Recurse

                        $sScrParentFolder = split-Path -path $strSourcePath -Leaf

                        #$sgetDateTime =  Get-Date -Format s

                        $sgetDateTime1 = $(get-date -f yyyyMMdd_HH-mm-ss)
                        
                        $sDateTimeFolderName =  $sScrParentFolder + "-" + $sgetDateTime1
                        
                        
                        $sDestinationPath = New-Item -ItemType Directory -Path "$sDestinationPath\$sDateTimeFolderName"


                        ROBOCOPY.EXE $strSourcePath $sDestinationPath /COPYALL /B /SEC /MIR /R:0 /W:0 /NFL /NDL


                    Else 
                    {
                        Write-host " Source or Destination is not reachable or does not exist..."
                    }


################################################################################

Note:- Please test script in your test environment before running in production directly.

Monday, April 15, 2019

Step by step guide for creating google windows cloud machine on - https://cloud.google.com

Google Launch the cloud platform to create your VM machine on cloud. Its going to make big change in infra landscape and big competitor for Amazon (AWS) and  Microsoft(Azure).Google always think about consumer .


Here you can see how to create google cloud windows machine and take RDP from your machine.

Login https://cloud.google.com from your Gmail ID. You have to enter your credit card detail for make sure you are authentic user. Google is giving 300$ for one free for free trail so it will not deduct any amount of money

Until you will not upgrade it manually. This is the cheapest services on cloud.
Once you have done with credit card details.

1. Lets connect Console.


2.  Once you are connected.Please enable Computing Engine  and search top VMINSTANT in search bar


3.  Then Click on Create Button.


4.   Now you can see below form and give your first VM name in small letter and select in which      region you want to create VM .I am selection Europe and select your VM configuration, Machine   type, Memory.


5. Select boot media which operating system you want opt .I have select Windows server 2016 .Please click change button 


6. Scroll down to find your OS boot media and select click on select button.


7.  Access scope  should be Allows HTTPS  Traffic  and create your VM. Once you hit select button .It starting a creating VM in background and magic of GOOGLE. Its create within 1 minutes 


8.   Now you can see your first VM machine.


9. Take RDP Google Cloud test machine.select set windows Password .Please copy you user name password .


 10. Click on your machine and select the RDP option and .It will not show again.


11. Double click on RDP session


12. Enter you user name password 


13.  Press yes again for certificate 


14 Enjoy your VM experience with google  ðŸ˜Š


Thanks for viewing. I hope it will help you.More configuration you can visit belong google links

Links :


Wednesday, April 3, 2019

How to Get windows Operating System Details with PowerShell


Here is the some command to get the windows system info from Power-Shell scripts.


windows 10 name, architecture, operating system

  $sOSName = (Get-WMIObject win32_operatingsystem).name
  Write-Host "OS NAME = $sOSName " -ForegroundColor Green `n

  $sOSArchitecture = (Get-WmiObject Win32_OperatingSystem).OSArchitecture
  Write-Host "OS Architecture = $sOSArchitecture " -ForegroundColor Yellow `n

  $sSystemName = (Get-WmiObject Win32_OperatingSystem).CSName
  Write-Host "System Name = $sSystemName " -ForegroundColor Red `n


1. Get-WmiObject -Class Win32_ComputerSystem
    Get-CimInstance Win32_OperatingSystem -ComputerName dc1, dc2


2.  Get-CimInstance Win32_OperatingSystem | Select-Object Caption, Version,                 ServicePackMajorVersion, OSArchitecture, CSName, WindowsDire


     All computer Info
3.  Get-ComputerInfo -Property "os*"


   Listing BIOS Information

 4. Get-CimInstance -ClassName Win32_BIOS


5. Hot Fix Installed in windows machine.

Get-WmiObject -Class Win32_QuickFixEngineering


6. Get-CimInstance Win32_OperatingSystem | Select-Object  Caption, InstallDate,  ServicePackMajorVersion, OSArchitecture, BootDevice,  BuildNumber, CSName | FL


Note:- Please test script in your test environment before running in production directly.

Tuesday, March 19, 2019

Progress bar in Power-Shell


Progress bar function is very important function in power shell. It’s always good to use show progress bar when you are running some process in your script. GUI effect makes you script much interactive and informative .Here  I am discussing  some of the power shell progress bar .We my be help full to someone.


#################################################################################

for($I = 1; $I -lt 101; $I++ )
{
    Write-Progress -Activity Updating -Status 'Progress->' -PercentComplete $I -CurrentOperation OuterLoop
    for($j = 1; $j -lt 101; $j++ )
    {
        Write-Progress -Id 1 -Activity Updating -Status 'Coping the file' -PercentComplete $j -CurrentOperation InnerLoop
    }
}

#################################################################################


################################# Function on progress bar ###########################

function Progress-Bar($iSeconds,$sInUnString)
{
    $Host.UI.RawUI.BackgroundColor = ($bckgrnd ='Black')                                                               # Changing the progress bar color and background text color
   # $Host.PrivateData.ProgressForegroundColor ='Green'
   # $Host.PrivateData.ProgressBackgroundColor='Black'

    $DoneDT = (Get-Date).AddSeconds($iSeconds)
    while($DoneDT -gt (Get-Date))
{
        $iSecondsLeft = $DoneDT.Subtract((Get-Date)).TotalSeconds
        $iPercent = ($iSeconds - $iSecondsLeft) / $iSeconds * 100
        Write-Progress -Activity "$sInUnString Apple.." -Status " " -PercentComplete $iPercent
        [System.Threading.Thread]::Sleep(500)
    }
 }

 Progress-Bar "20" "Best Company to work"

#################################################################################


############################### Time you can give here ##############################

$totalTimes = 10

  $i = 0

  for ($i=0;$i -lt $totalTimes; $i++) {

  $percentComplete = ($i / $totalTimes) * 100

  Write-Progress -Activity 'Work in Progress' -Status "Did thing $i  times" -PercentComplete $percentComplete

  sleep 1

}

#################################################################################


################################# Pause Program for 15 min #########################

###===========================
### Pause Program for 15 min
### - Matt Brown, 2008
###===========================
$x = 15*60
$length = $x / 100
while($x -gt 0) {
  $min = [int](([string]($x/60)).split('.')[0])
  $text = " " + $min + " minutes " + ($x % 60) + " seconds left"
  Write-Progress "Pausing Script" -status $text -perc ($x/$length)
  start-sleep -s 1
  $x--
}

#################################################################################


################################## Three progress bar################################

for ($i = 1; $i -le 2; $i++)
{
    Write-Progress -ID 1 -Activity "Outer loop" -Status "Tick $i" -percentComplete ($i / 2*100)
    for ($j = 1; $j -le 3; $j++)

    {
               Write-Progress -ID 2 -Activity "Mid loop" -Status "Tick $j" -percentComplete ($j / 3*100)
               for ($k = 1; $k -le 3; $k++)

           {

            Write-Progress -ID 3 -Activity "Inner loop" -Status "Tick $k" -percentComplete ($k / 3*100)
            Sleep(1)
           }
    }

}

#################################################################################