Friday, October 1, 2021
PowerShell Script to copy All Users Profile data in C:\Users\USERID
Tuesday, June 1, 2021
Power shell to create Win10 "This PC" ICON on ALL users desktop from HKLM:
HKLM:\SOFTWARE\Microsoft\Windows\CurrentVersion\Explorer\HideDesktopIcons\NewStartPane
Friday, March 12, 2021
PowerShell for Scale Up and Scale down service plan on Azure - Runbook
If as azure admin you want to scale up and scale down your azure service plan environment during the weekend for saving a cost so this power shell can help you to create runbook
Main Command
Set-AzureRMAppServicePlan -Tier Standard -Name "serviceplanname" -ResourceGroupName "nameoftheresource"
Specifically:
-Tier identifies the type of Tier that we want to set: free, shared, basic, standard or premium
-Name allows us to specify the type of Tier we need, for example if the Tier is Standard, the Name could be S1, S2 or S3
Tier parameter
Free - F1
Shared - D1
Basic = B1
Standard = S
Premium = P
You can use below Script in runbook. Change the value for $resourceGroupName and $appServiceName and pass the -Tier Free\Shared\Basic
+++++++++++++++++++++++++++++++++++++++++++++++++++++++++++++++++++++++
$resourceGroupName = "XXXXXXXX"$appServiceName = "XXXXXX"
filter timestamp {"[$(Get-Date -Format G)]: $_"}
Write-Output "Script started." | timestamp
#Authenticate with Azure Automation Run As account (service principal)
$runAsConnectionProfile = Get-AutomationConnection `
-Name "AzureRunAsConnection"
Add-AzureRmAccount -ServicePrincipal `
-TenantId $runAsConnectionProfile.TenantId `
-ApplicationId $runAsConnectionProfile.ApplicationId `
-CertificateThumbprint ` $runAsConnectionProfile.CertificateThumbprint | Out-Null
Write-Output "Authenticated with Automation Run As Account."
#Modifying size of AppService Plan
Set-AzureRMAppServicePlan -Tier Free -Name "HendtestAppSerplan" -ResourceGroupName "RG-Dormakaba"
# Get the App Service object and show its new state
$appService = Get-AzureRmAppServicePlan -ResourceGroupName $resourceGroupName -Name $appServiceName
Write-Output "App Service Plan name: $($appService.Name)" | timestamp
Write-Output "Current App Service Plan status: $($appService.Status), tier: $($appService.Sku.Name)" | timestamp
Reference Link : https://techoosolutions.wordpress.com/2017/02/02/change-azure-appserviceplan/
Saturday, June 20, 2020
How to delete mount drive in windows 10 and server from Power Shell
Thursday, June 11, 2020
My Review on "Hydration Kit For Windows Server 2016 and ConfigMgr Current" is 5 ***** 😊
Wednesday, June 3, 2020
IMP - WMI & Powershell Commands
Tuesday, May 26, 2020
Power-Shell imp links and command
Thursday, June 13, 2019
Microsoft Teams Deployment and auto-start disable configuration
- .NET framework 4.5 or later
- Windows 7 or later
- 3 GB of disk space for each user profile
(recommended)
How to Disable AutoStart permanently while every time user login
https://www.lync.se/2018/04/stop-microsoft-teams-auto-start/
Tuesday, May 7, 2019
How to share\Copy ISO,EXE,Software files in VM Hyper-v machine from local host machine
- Open Run ( Win+r ) or type the command Diskmgmt.msc
2. Now go to Action tab and Create VHD
- Now open Diskmgmt.msc and you can see new disk.
- The Initialize
Disk window will automatically appears, select a partition style for
the disk and click Ok.
- Select
MBR Partition
If disk is offline just right click and make it on line
Now you can see the volume is creates in your host machine.
- Open Hyper-v Manager in your host machine
- Select the Virtual Machine that
you would like to attach a virtual disk(VHD)
- Click in Settings from
the right side.
- Click in SCSI Controller from
the left side
- Select Hard drive and
click Add
- Click Browse (VHD)and find the
virtual disk that you would like to attach
- Click OK
More info you can see below link.
Monday, April 29, 2019
Power shell and .vbs to get machine OU details from AD
You can get the machine name OU Details from using below command and VB script
Power-Shell
([adsisearcher]"(&(name=$env:computername)(objectClass=computer))").findall().path
VB Script (save below command in.vbs Fotomat)
########################################################################
On Error Resume Next
Set WshNetwork = CreateObject("WScript.Network")
ComputerName = WshNetwork.ComputerName
Set objADSysInfo = CreateObject("ADSystemInfo")
strComputerName = objADSysInfo.ComputerName
Set objComputer = GetObject("LDAP://" & strComputerName)
strOUName = objComputer.DistinguishedName
strOUs = Split(strOUName, ",")
MsgBox strOUs(2)
MsgBox strOUs(1)
strOU = Split(strOUs(2), "=")
#######################################################################

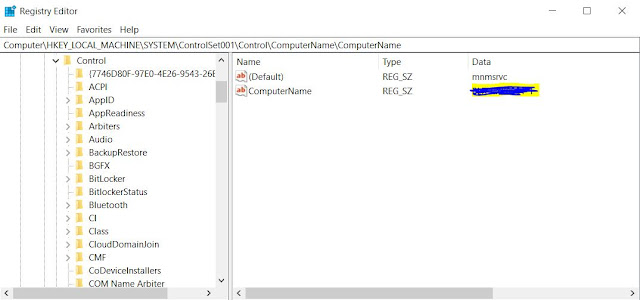
Get computer name from hard disk or Slave Drive
Please follow the steps here.
connect your hard disk by cable in your test machine or you already inserted disk in PC.Both the conditions please below steps.
1. Open Regedit on the lab system from RUN window and Go to file option in menu and click on load hive.
2. Please enter the name like Mymachine
3. Navigate to below path
SystemDrive:\Windows\System32\config\ and browse the System file.
4. Now navigate the hive HKLM
HKEY_LOCAL_MACHINE\SYSTEM\ControlSet001\Control\ComputerName\ComputerName
Hope this info will help some one...
Friday, April 19, 2019
Set up A Hyper-v virtual switch using a NAT network from power shell
You can find more info here.
https://www.thomasmaurer.ch/2016/05/set-up-a-hyper-v-virtual-switch-using-a-nat-network/
I am not good to understand the IP address world so just making a simple note for my self and other guys like me.
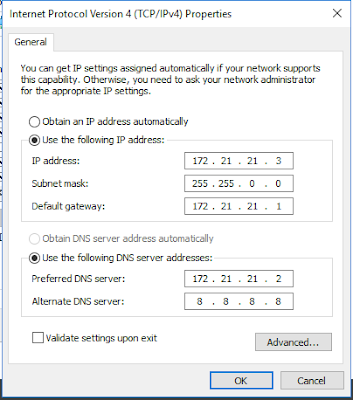
Please follow the below steps to get the internet access in your VM machine
1. Create a new Hyper-V Virtual Switch
Use IP Address in VM host namchine from 172.21.21.2-172.21.21.254.
IP Address – 172.21.21.1
Subnet Mask – 255.255.255.0


